There are two types of coupling actions: pre-implemented ones and user-defined ones. For the latter, you can access coupling meshes through a Python callback interface.
Basics and pre-implemented actions
<participant name="MySolver1">
    <provide-mesh name="MyMesh1" />
    <write-data name="Stresses" mesh="MyMesh1"/>
    ...
    <action:multiply-by-area mesh="MyMesh1" timing="write-mapping-post">
        <target-data name="Stresses"/>
    </action:multiply-by-area>
    ...
</participant>
This example multiplies the stresses values by the respective element area, transforming stresses into forces. Please note that for this specific action, mesh connectivity information needs to be provided. (edges, triangles, etc. through setMeshEdge or similar API functions.
timing defines when the action is executed. Options are:
write-mapping-post: at the end of a time window, directly after the write mappings are applied, but still before data communication.read-mapping-post: at the end of a time window, directly after the read mappings are applied, and thus also after data communcation.
Pre-implemented actions are:
multiply-by-area/divide-by-area: Modify coupling data by mesh areasummation: Sum up the data from source participants and write to target participant
<read-data ... /> or <write-data ... /> tags.
For more details, please refer to the XML reference.
Python callback interface
Other than the pre-implemented coupling actions, preCICE also provides a callback interface for Python scripts to execute coupling actions. To use this feature, you need to build preCICE with python support.
We show an example for the 1D elastic tube:
<participant name="Solid">
    <provide-mesh name="Solid-Nodes-Mesh" />
    <receive-mesh name="Fluid-Nodes-Mesh" from "Fluid" />
    <write-data name="CrossSectionLength" mesh="Solid-Nodes-Mesh" />
    <read-data name="Pressure" mesh="Solid-Nodes-Mesh" />
    <action:python mesh="Solid-Nodes-Mesh" timing="read-mapping-post">
        <path name="<PATH_TO_PYTHON_ACTION_SCRIPT>"/>
        <module name="<PYTHON_SCRIPT_NAME.PY>"/>
        <source-data name="Pressure"/>
        <target-data name="Pressure"/>
    </action:python>
</participant>
The callback interface calls the following function:
performAction(time, sourceData, targetData)
Without the Python action, the 1D elastic tube gives the following results:
Now, we want to ramp up the pressure values written by the fluid solver over time. A feature often needed to get a stable coupled simulation.
def performAction(time, sourceData, targetData):
    # Source and target data can be omitted (selectively or both) by not mentioning
    # them in the preCICE XML configuration.

    timeThreshold = 0.2 # Ramp up the pressure values until this point in time

    if time < timeThreshold:
        for i in range(targetData.size):
            # Ramp up pressure value
            targetData[i] = (time / timeThreshold) * sourceData[i]

    else:
        for i in range(targetData.size):
            # Assign the computed physical pressure values
            targetData[i] = sourceData[i]
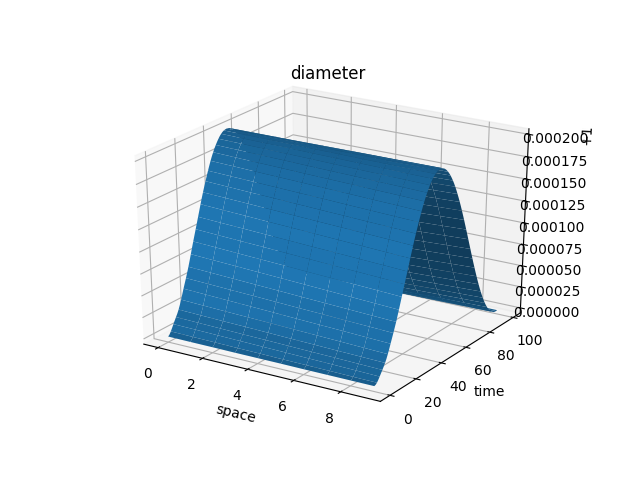
With the Python action, you should now get the following results. Note the lower maximum diameter and the change at t=0.2 (t=20 in the graph).